How to create your first Jenkins Job
Creating your first Jenkins Job


- Prerequisite: Jenkins is installed and configured, if you need any help doing so, refer the steps here and here.
- Navigate to your Jenkins dashboard by browsing http://localhost:8080
- Since we are going to create a Maven job, lets first install the maven integration plugin and a couple of other plugins which will help us with reports.
- Click on "Manage Jenkins" from the left pane and then click on "Manage Plugins"
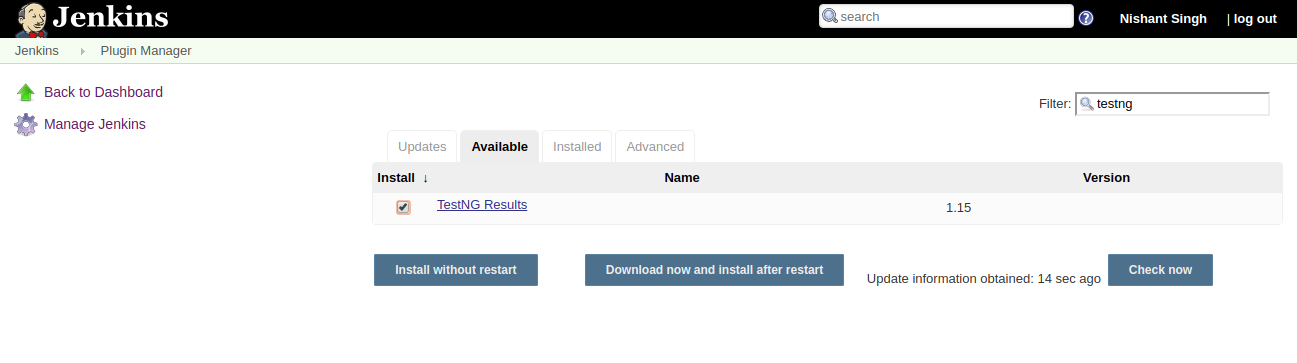
- Click on "Available" tab and search for maven in the Filter text box. Select "Maven Integration" from the list of suggestions.

- Next, you can also select "TestNG Results" and "HTML publisher" plugin which we will use for publishing reports.

- Optional: You can also select "Green Balls" plugins if you don't like the blue color balls of maven and want to show it in Green color on build success.

- Once you are done selecting the plugins you wish to install, click on the "Install without restart" button, this will start installing the plugins you selected. Check the checkbox for "Restart Jenkins when installation is complete and no jobs are running" which will restart your Jenkins once the plugins installation is completed and they will be ready for you to use.

- Once your plugins are installed you will see a message "Please wait while Jenkins is restarting..."

- In few seconds you will have your Jenkins back online, and if its not up, feel free to refresh the page.
- Now that all required plugins are in place, let's create our first Jenkins job. Go to Jenkins Home page and click "New Item" from the left pane. On the new job page, give your Job a meaningful name and select the Maven project. If you have not installed "Maven Integration" plugin you will not see this option, so ensure your plugin is installed.

- Click "OK" and you will be redirected to the job configuration page.
- In the "General" section, you can enter the Description for your Job, check "Execute concurrent builds if necessary" if you wish to allow two instance of your same job to run in parallel, "Restrict where this project can be run" can be checked and if you wish to restrict execution of your job on a particular Jenkins node and you can enter the node name in "Label Expression" field. All these are optional, so if you are not sure, leave them unchecked for now.

- The next section is "Source Code Management". If you want to pull your code from Git, you can select Git and give your repository URL. If your repo is a public repo you don't need to add any credentials but if it is private repo click "Add" -> "Jenkins" and enter your credentials in the "Jenkins Credentials Provider" pop up. In the "Branch Specifier" you can add your branch name or leave it as "*/master" if you are using master branch.


- The next section is "Build Triggers". By default "Build whenever a SNAPSHOT dependency is built" is checked, you can leave it as Checked, this builds the job whenever a snapshot dependency is built successfully. You can choose "Build periodically" option if you wish to schedule your build and give the required Cron expression. Let's say you want the build to run every 30 mins, you can give the Cron expression as "H/30 * * * *"


- In the next section "Build Environment" you have few options to select which are self-explanatory such as Delete workspace before build starts, Abort the build if it's stuck, Add timestamps to the Console Output etc. You can choose them based on your need or leave them unchecked for now if you are not clear what they are. We can also come back and change the configuration.
- In the "Pre Steps" section, you have an option of running a pre-build step if you like to such as Execute shell or Execute Windows batch command. Again this is optional and you can choose to not have any pre-build step if you don't need one.
- Now lets come to the "Build" section. Since we are creating a Maven Job, in the "Root POM" field we will give the path of our pom.xml. If your pom.xml is directly under the root directory, you can leave it with the default value "pom.xml". Under "Goals and options" field, enter the maven command you wish to execute (ex. clean install).
- In the next section "Build Settings", you can choose to send Email Notifications whenever the build is unstable or is back to stable.

- The next and the last section is "Post-build Actions", here you can configure a lot of post-build actions such as triggering other projects build, deploy the artifact to Maven or publish the report in Jenkins Dashboard if you have installed the required plugins which we did while installing Maven Integration plugin.

- Once you are done with all these configurations based on your need, click "Save". Go back to your Jenkins Homepage and you should see your job listed there. Click on the Job and click "Build Now" from the left pane to trigger your job. Alternatively, you can also click on the clock icon displayed next to your job on the Jenkins home page.

- Optional: If you face any issue while viewing the run reports from Jenkins, go to Jenkins -> Manage Jenkins -> Script Console and enter "System.setProperty("hudson.model.DirectoryBrowserSupport.CSP", "")" in the textbox and click Run twice.


Comments
Post a Comment